
How to Setup a Reverse Proxy in OMV with Let’s Encrypt SSL for Sabnzbd, Radarr, Sonarr and Transmission
In this tutorial I will show you how to setup a Nginx Reverse Proxy in OpenMediaVault for several popular applications: SABnzbd, Radarr, Sonarr and Tranmission.
If you want to access your OpenMediaVault NAS from the web (WAN), using a Reverse Proxy is the safest method. You only have to open up one port on your modem/router, instead seperate ports for each application. After following this tutorial Nginx will parse the URI (e.g. https://nas.yourdomain.com/sabnzbd) and forward that request to the corresponding port inside your local network (LAN).
In some tutorials the reverse proxy is set up using subdomains. I chose to use an Uri (e.g. https://nas.mydomain.com/sabznbd) so that all apps can use the same SSL-certificate provided by the Let’s Encrypt plugin.
Because I’ve spent a few days trying to figure this out, scrambling parts of other how-to’s together. I decided to put together my own tutorial on how to setup a reverse proxy for nginx in OpenMediaVault with Let’s Encrypt SSL encryption.
Prerequisites for this Tutorial
You have a NAS running on OpenMediaVault 2.x or higher with the OMV-Extras.org repository installed. Your domain forwarding (the A- and CNAME-records in your domain’s DNS) and port forwarding (on your router at home) is setup properly and working.
In other words, your NAS is already accessible from ‘the outside’, but now you want to secure it with SSL and an Nginx Reverse Proxy.
Disclaimer: I managed to apply this tutorial succesfully to Sabnzbd, Couchpotato, Sonarr (and Radarr, which works the same way) and Transmission. I’ve tried the same for Plex, but to create a Reverse Proxy for Plex we need a different approach.
Secure OpenMediaVault using Let’s Encrypt SSL
In this tutorial we will be using free SSL-certificates provided by Let’s Encrypt to secure the connection.
The OMV-Extra’s Testing repository (which can be enabled from the OMV-Extras.org-screen) provides a tailor-made plugin to add Let’s Encrypt support to Open Media Vault.
This first step shouldn’t be too much of a hassle and get you up and running in no time.
Installing Let’s Encrypt for OpenMediaVault
To install the Let’s Encrypt plugin follow the steps below. This is essentially the same procedure as installing any other plugin:
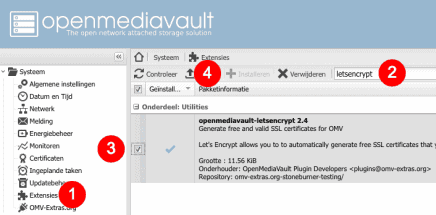
- Go to the Plugins-tab in the left-hand pane of OMV’s web interface.
- Enter ‘letsencrypt’ in the search-bar and press Return to start searching for the plugin.
- Add a check next to the listed extension named ‘openmediavault-letsencrypt x.x’.
- Press ‘install‘. (this option is greyed out in my screenshot, since I’ve already installed the extension)
After you’ve installed the plugin, OMV will aks you to apply the settings. Do that and proceed.
Configuring the Let’s Encrypt Plugin in OMV
You’re only a few steps away from fully encrypting your connection to OMV. The steps below are provided by the plugin’s author on the OpenMediaVault-forum, but I’ve added some screenshots and explanation to improve readability:
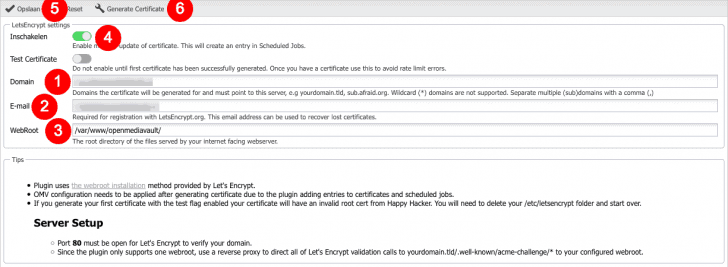
- Assuming you’ve managed to find Let’s Encrypt’s configuration-page, enter the domain you use to access OMV’s Web Interface (e.g. nas.mydomain.com) in the ‘Domain‘-field.
- Enter your e-mail address. This is required for registration to the Let’s Encrypt-club — that’s not really a thing. Still your e-mail address is required. 😉
- The ‘WebRoot‘ is used to store the generated certificates. This should be pre-filled with the value ‘var/www/openmediavault‘, leave this as is.
- Make sure to toggle ‘Enable‘ before pressing ‘Save‘. This will add a cronjob (to ‘Scheduled Jobs’) which automatically keeps your SSL-certificate valid.
- Press ‘Save‘ and apply the configuration changes.
- Click ‘Generate Certificate‘.
You can view your generated SSL-certificate by clicking the ‘SSL’-tab inside the ‘Certificates‘-screen.
Now you’ve succesfully generated a Let’s Encrypt SSL-certificate for your OpenMediaVault NAS. You have to configure OpenMediaVault to actually use it:
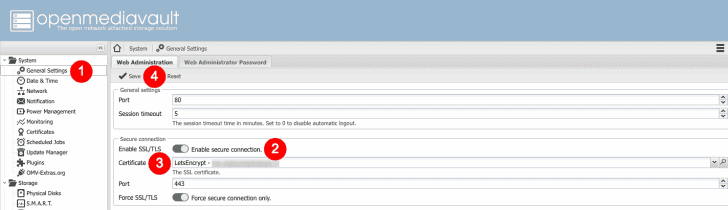
- Enter ‘General Settings‘.
- Toggle the switch besides ‘Enable SSL/TLS‘.
- Select the Let’s Encrypt-certificate followed by your NAS’ web address (e.g. nas.mydomain.com) in the pulldown menu underneath.
- Press ‘Save‘.
Now you should be able to access your OMV Web Interface by visiting e.g. https://nas.mydomain.com. I suggest using a private session (Firefox: CTRL/CMD + SHIFT + P / Chrome: CTRL/CMD + SHIFT + N) to prevent redirects and stored sessions.
You might’ve noticed that I have ‘Force SSL/TLS’ enabled in my configuration. Before you do this, make sure your OMV Web Interface is fully accessible over SSL.
Pro-tip! By default, this plugin adds a cronjob (visible underneath ‘Scheduled Jobs’) which checks for your certificate’s validity once a month. I’ve had a few times that the cronjob failed, due to outages in Let’s Encrypts’ validation servers. Changing the cronjob’s schedule to ‘weekly‘ will save your live! You’re welcome 🙂
That’s it. Now you’ve fully secured OpenMediaVault using a SSL-certificate provided by Let’s Encrypt. In the following chapters we’re going to use this certificate to setup a secure Reverse Proxy for popular applications such as Plex, Radarr, Sonarr, Sabnzbd+ and Transmission.


You don’t need Sonarr’s “Enable SSL” if you’re implementing the HTTPS encryption with Let’s Encrypt at the reverse proxy level, I assume.
You’re right. I guess I enabled that setting without thinking. Just make sure you’re directing the proxy to the non-ssl port, but that’s all!
While I appreciate the time you took to write this article, the title is incredibly misleading. I came here for info on sonarr reverse proxying yet I can only find sabnzbd, with a configuration that will result in a imperfect configuration at that.
What are you talking about? It’s on page 3 of this article…
This tutorial is outdated. You should consider revising it as certain things changed in Letsencrypt interface.
Al right. Thanks for the feedback. I’ll add it to my to-do list!
Hi Daan,
Thanks so much for your useful guide! I set this up months ago and it’s been working perfectly up until yesterday. I haven’t changed any settings but it’s just stopped working 🙁 I rebooted my router, double checked the port forwarding was still in place, checked the certificate was still valid etc and nada 🙁 I can see that DuckDNS is working correctly also, it’s correctly obtaining my WAN IP.
Do you have any ideas?
I’m a bit confused when you say that the NAS needs to be accessible from outside. So if I want to access OMV, I need to type for example mydomain.com:portToMyNAS. Then my router will forward this request to my NAS and the login page will be displayed. Is this what you mean?
Also isn’t this a security risk – shouldn’t we use an VPN service instead of leaving it directly open to the public internet?
If you want to use a VPN, then using a reverse proxy isn’t relevant IMO. You can just access your NAS from inside your VPN.
But to answer your question. It’s not necessarily a security risk if OMV (your NAS’s IP, on port 443/80) is accessible over WAN.
Hi Daan,
I’ve successfully installed the certificate, and installed sonarr – used your config for the ngnix. The problem is that i get the following web page when I try to load mydomain.com/sonarr: https://imgur.com/a/HUxfC16 (this image shows my internal IP, but the same thing happens if I use my domain)
I’ve port forwarded port 80 and 443 in my router to my OMV server. Also the OMV server has ports 80 and 443 setup (in general settings > web administration).
What am I doing wrong?
Thanks.
This does not work on OMV5 as there is no Let’s Encrypt plug-in. T_T
Hi Michelle,
There is no Let’s Encrypt plugin for OMV5, correct. There is a docker image, though! 🙂 Since OMV4 loads of plugins were dockerized and weren’t ported anymore.